How to Use Keycloak SSO for My Homelab Applications
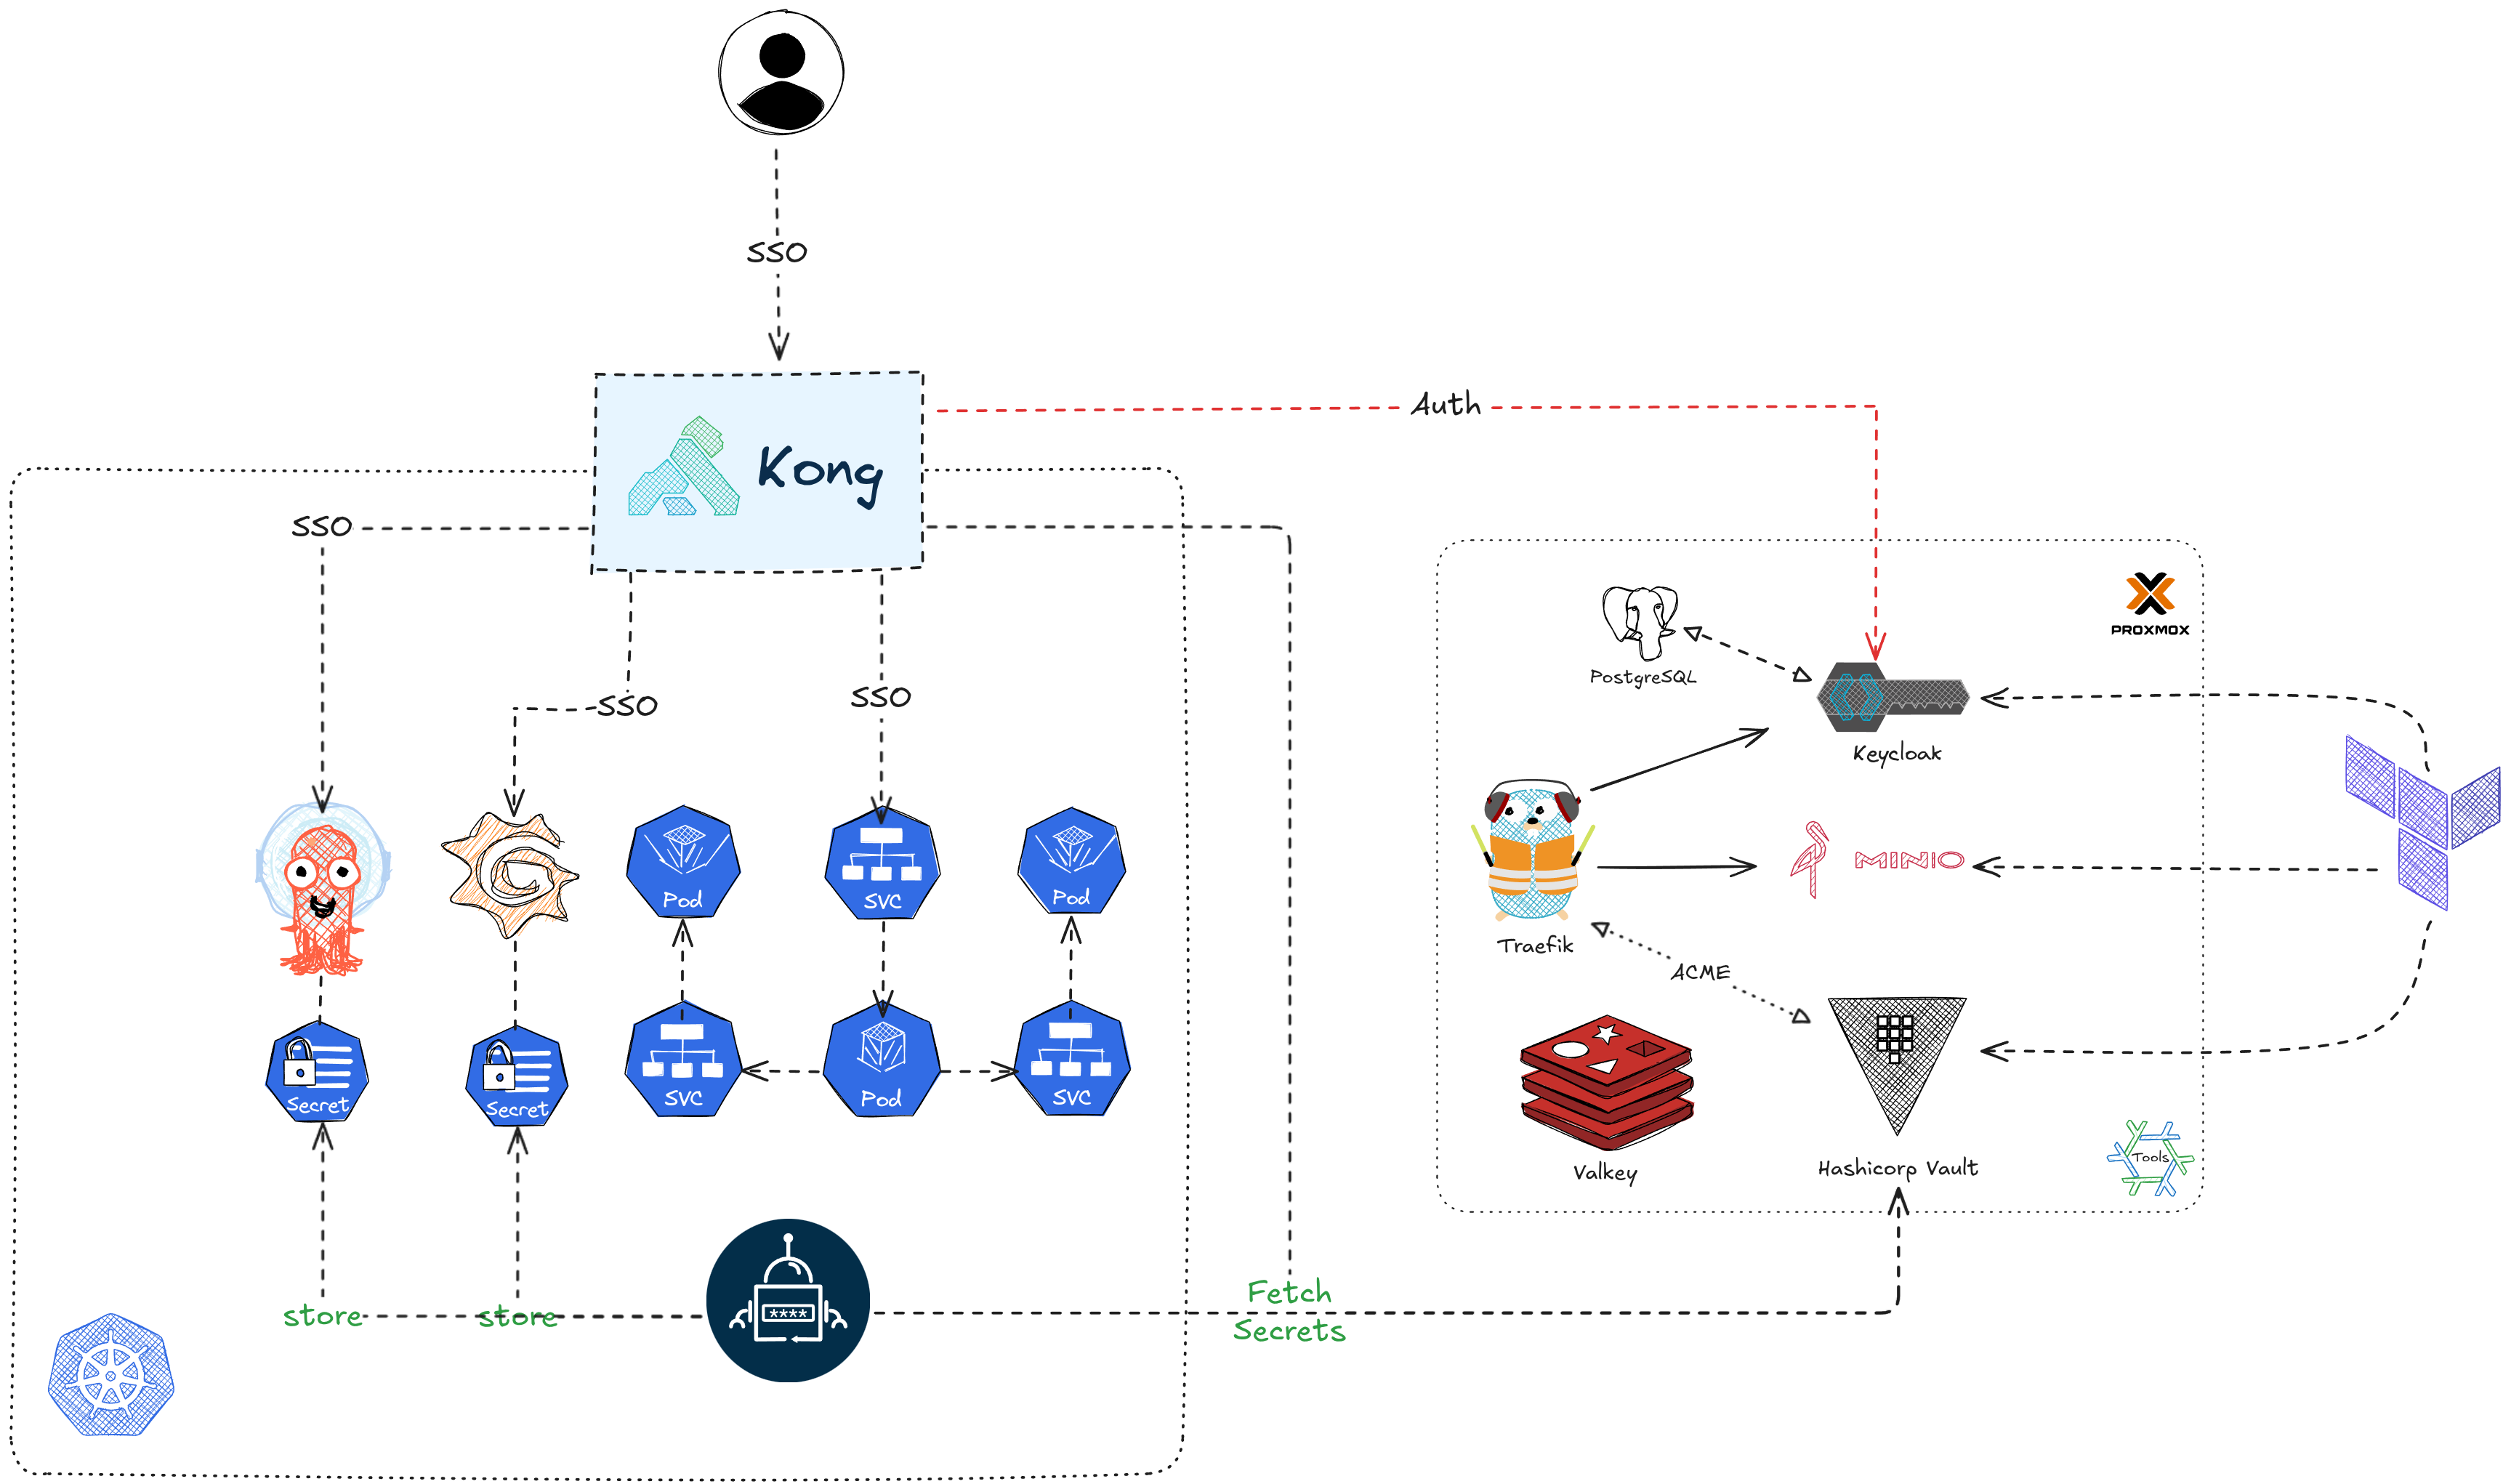
In my previous post, I explained how I manage my server declaratively. As part of that setup, I use Keycloak as the Identity Provider to enable Single Sign-On for applications running on my homelab cluster via the OpenID Connect Authorization Code Flow. In today’s post, I’ll walk you through how to configure Keycloak to secure these homelab applications.
AuthN and AuthZ
Before we start, it’s important to understand the concepts of authentication and authorization, as well as Keycloak’s role in managing them. Authentication verifies a user’s identity, ensuring they are who they claim to be. Authorization on the other hand, determines what actions or resources a user is allowed to access after their identity has been authenticated.
Keycloak will be used for:
- User Management
- JWT Token Issuance
- Injecting Token Claims for application-specific access control
In the Authorization Code Flow, users are redirected to the Keycloak login page to authenticate and provide consent. Upon successful authentication, Keycloak returns an id_token and an access_token to the application. The application validates the token signature and uses the claims (e.g., roles, groups) in the payload to grant or restrict access. Configuring SSO for different applications requires understanding the claims and values expected by each application and mapping them to internal roles.
Let’s explore how to configure Keycloak for each application.
Keycloak
Clients
In Keycloak, a client represents an application or service that interacts with the Keycloak server. While it’s technically possible to use a shared client for multiple applications, the recommended best practice is to create a dedicated client for each application.
In this post, we’ll only use authorization code flow for all applications hence the client config is the same for all applications. The client configuration is managed using Terraform as below.
1 | resource "keycloak_openid_client" "<app_name>" { |
The setup is pretty straightforward. I only enable authorization code flow for each app, use the app name as the client_id, generate the client_secret locally, encrypt it with SOPS, and pass it to Terraform for creation in Keycloak.
Users, Groups, Roles, Claims and Scopes
Keycloak is also used for user management. To understand how authorization works, it’s essential to grasp the following concepts:
- Users: Represent individuals authenticating with Keycloak. For my homelab setups, as I am the only user, I can use User-Based Access Control to have permissions assigned directly to my users.
- Roles: Define permissions and are commonly used in Role-Based Access Control to to restrict system access to authorized users based on their roles.
- Groups: Organize users into subsets that can inherit roles and permission automatically.
- Claims: Contain user information (e.g., roles, groups) and are included in issued JWTs or introspection results.
- Scopes: Simply put are groups of claims. Clients request specific scopes, and the associated claims are added to tokens.
In summary, users are added to groups, permissions are assigned to roles, groups inherit roles, and scopes determine which claims are injected in tokens. Let’s see how these concepts are applied in each application.
Hashicorp Vault
The first application we will check out is hashicorp vault and we will start simple by using user-based access control meaning the permission will be assigned to one particular user only.
Auth backend
On the vault side, we will create a jwt auth backend as below.
One advantage of self-hosting Keycloak is full control over clients, for example I can declare client_id and client_secret.
In this example, we grant the vault-admin user the admin role by mapping the preferred_username claim in Keycloak-issued tokens to the user_claim in vault. The bound_claims ensure only the vault-admin user can use the Vault admin role.
1 | resource "vault_jwt_auth_backend" "oidc" { |
Keycloak User and client
Redirect URL for Hashicorp Vault client:
2
3
4
5
6
"https://<vault>:8200/ui/vault/auth/oidc/oidc/callback"
]
web_origins = [
"https://<vault>:8200"
]
On the keycloak side, create the vault-admin user and make sure the valid_redirect_uris and web_origins are updated accordingly.
1 | resource "keycloak_user" "vault-admin" { |
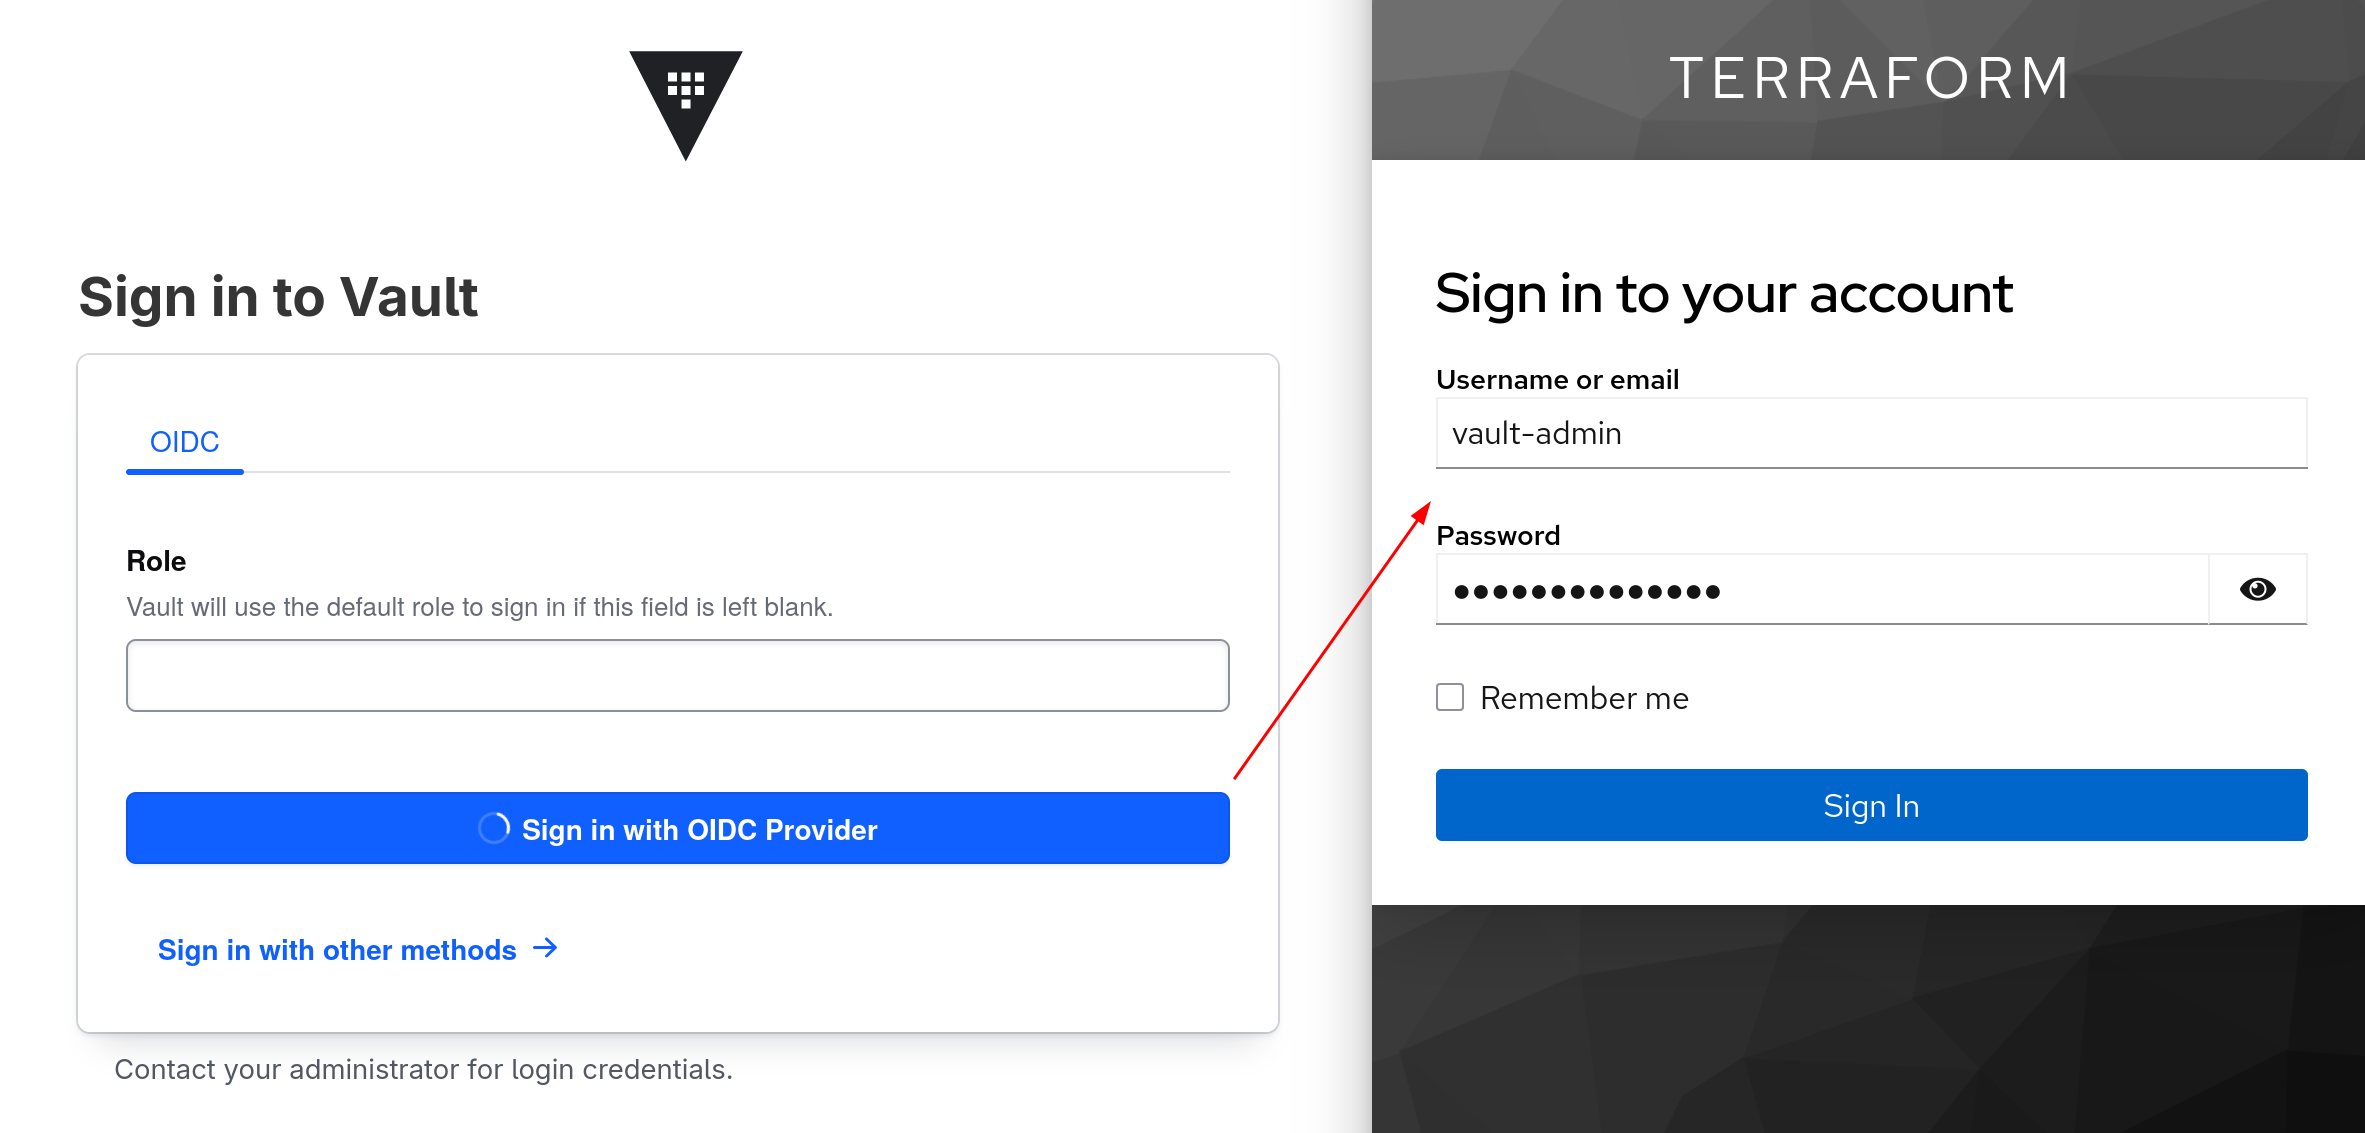
Now, we can log in to the HashiCorp Vault UI using OIDC.
Grafana
Next, we’ll configure Keycloak for Grafana, using Role-Based Access Control.
Role Mapping
Let’s go back to the official doc and we can see Grafana maps roles based on the roles claim in the id_token. The example mapping is as follows:
1 | role_attribute_path = contains(roles[*], 'grafanaadmin') && 'GrafanaAdmin' || contains(roles[*], 'admin') && 'Admin' || contains(roles[*], 'editor') && 'Editor' || 'Viewer' |
This mapping assigns Grafana role based on roles claim follows below priority:
- If roles contains grafanaadmin -> assign GrafanaAdmin.
- Else if roles contains admin -> assign Admin.
- Else if roles contains editor -> assign Editor.
- If none of those match -> assign Viewer.
For simplicity, I’ll use only the GrafanaAdmin role. Below is part of my helm values.yaml file for OIDC SSO.
1 | grafana.ini: |
Keycloak role and group setup
Redirect URL for grafana client:
2
3
4
5
6
"https://<grafana>/login/generic_oauth"
]
web_origins = [
"https://<grafana>"
]
In Keycloak, create the following entities:
- role: grafanaadmin
- user: grafana-admin
- group: grafana_admins
1 | resource "keycloak_role" "grafanaadmin" { |
Then I add user grafana-admin to the grafana_admins group and assign role grafanaadmin to the group. This setup ensures that any user added to the grafana_admins group automatically inherits grafanaadmin role.
1 | resource "keycloak_group_memberships" "grafana_admins_group_members" { |
The last step is to add the roles claim to the grafana client. Since Grafana check roles claim from id_token, we add this claim to id_token only.
1 | resource "keycloak_openid_user_client_role_protocol_mapper" "grafana_roles_claim" { |
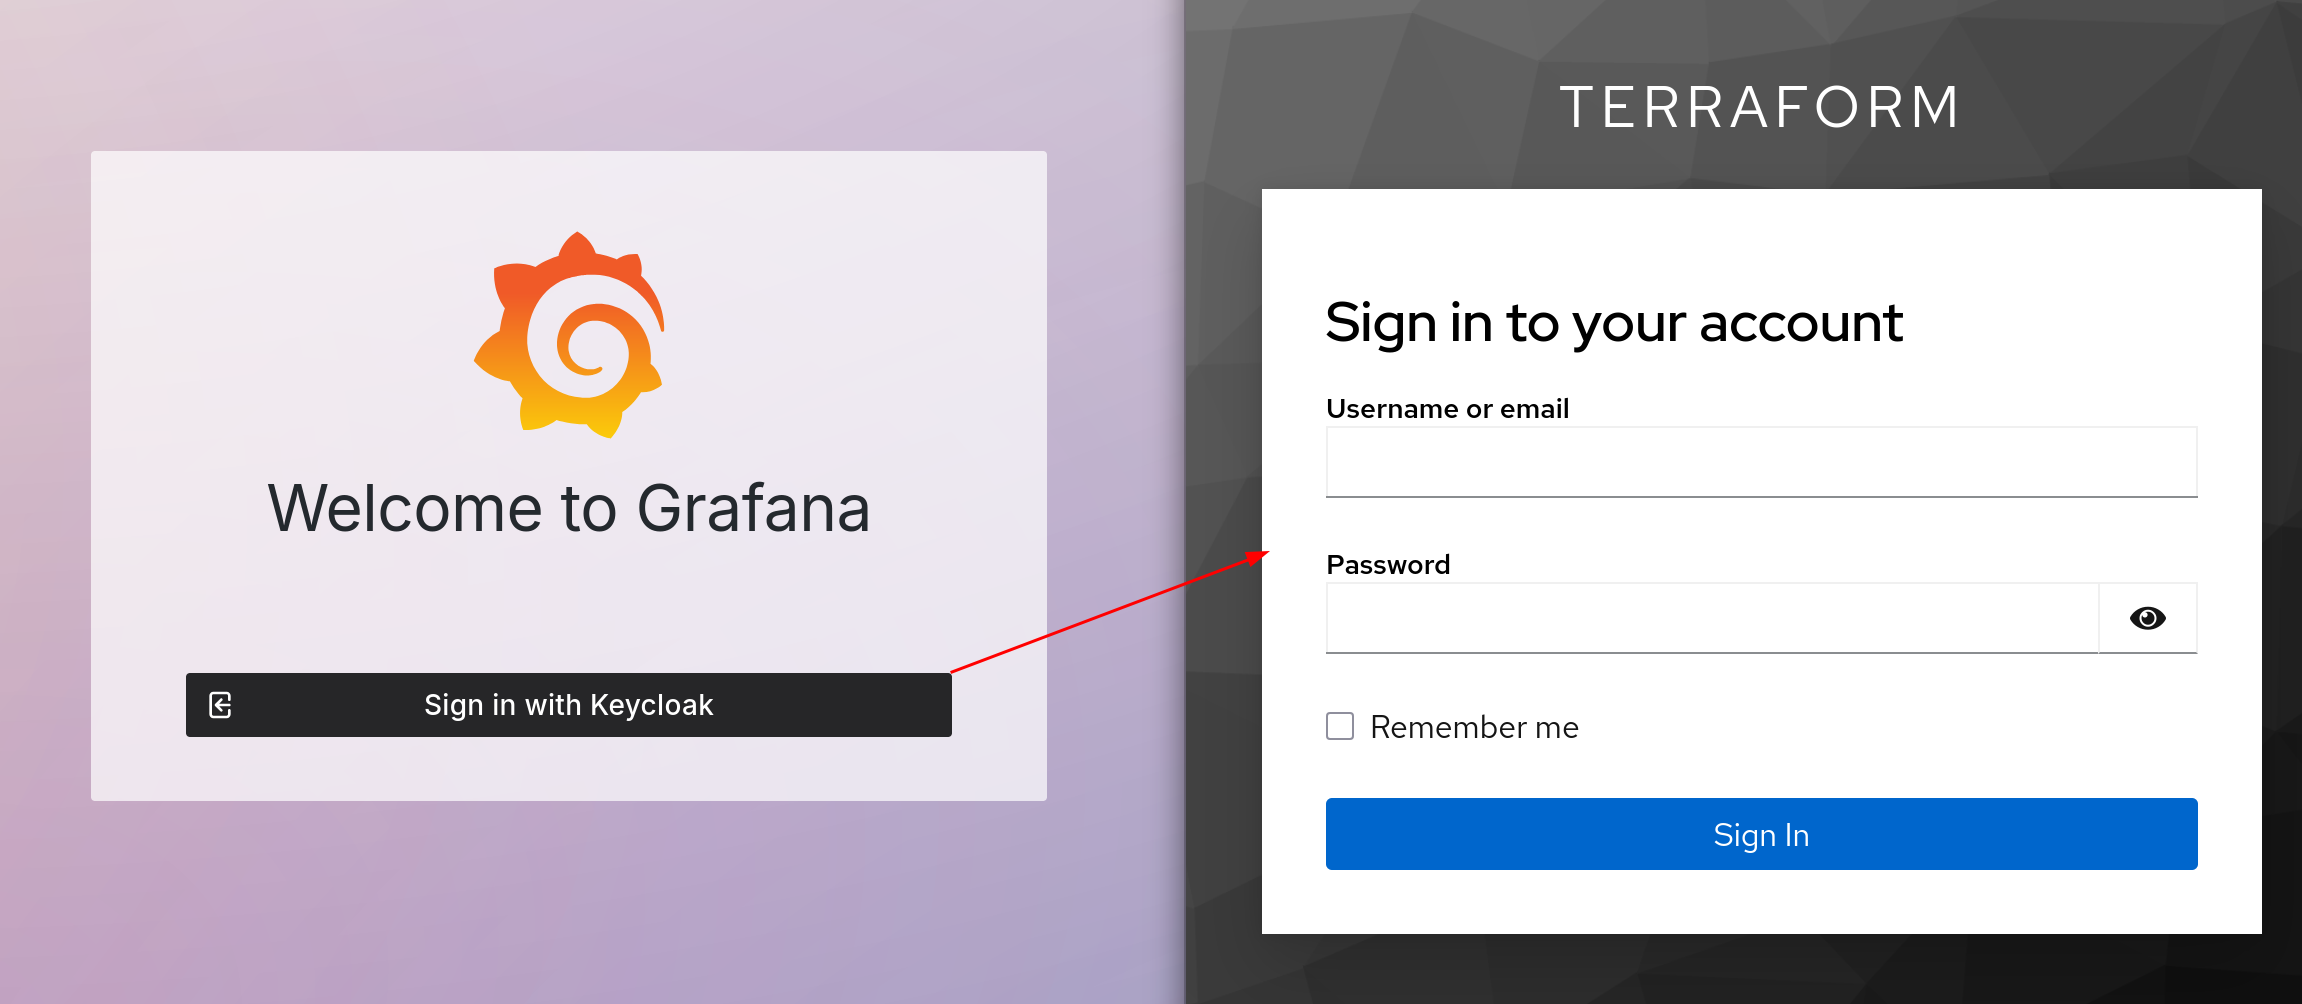
Once configured, we can log in to Grafana via Keycloak.
ArgoCD
The next application is ArgoCD, where we’ll explore group-based access control using scopes.
Group mapping
ArgoCD has probably the best documentation among these three apps.
In this given example, grafana map admin role to all users in the ArgoCDAdmins group.
1 | apiVersion: v1 |
To enable this, we need to make claim is added to id_token. Below is my OIDC configuration.
1 | cm = { |
We can see the requestedScopes are openid profile email and groups. The groups scope is not included by default and let’s see how we can add this scope to our client.
Keycloak group and scope set up
Redirect URL for argocd client:
2
3
4
5
6
"https://<argocd>/auth/callback",
]
web_origins = [
"https://<argocd>"
]
Let’s create the ArgoCDAdmins group, create and add the argocd-admin user to it.
1 | resource "keycloak_user" "argocd-admin" { |
Next we will create groups scope and map groups claim to it.
1 | resource "keycloak_openid_client_scope" "groups_scope" { |
Lastly let’s add groups scope as optional to argocd client.
1 | resource "keycloak_openid_client_optional_scopes" "argocd_groups_optional_scope" { |
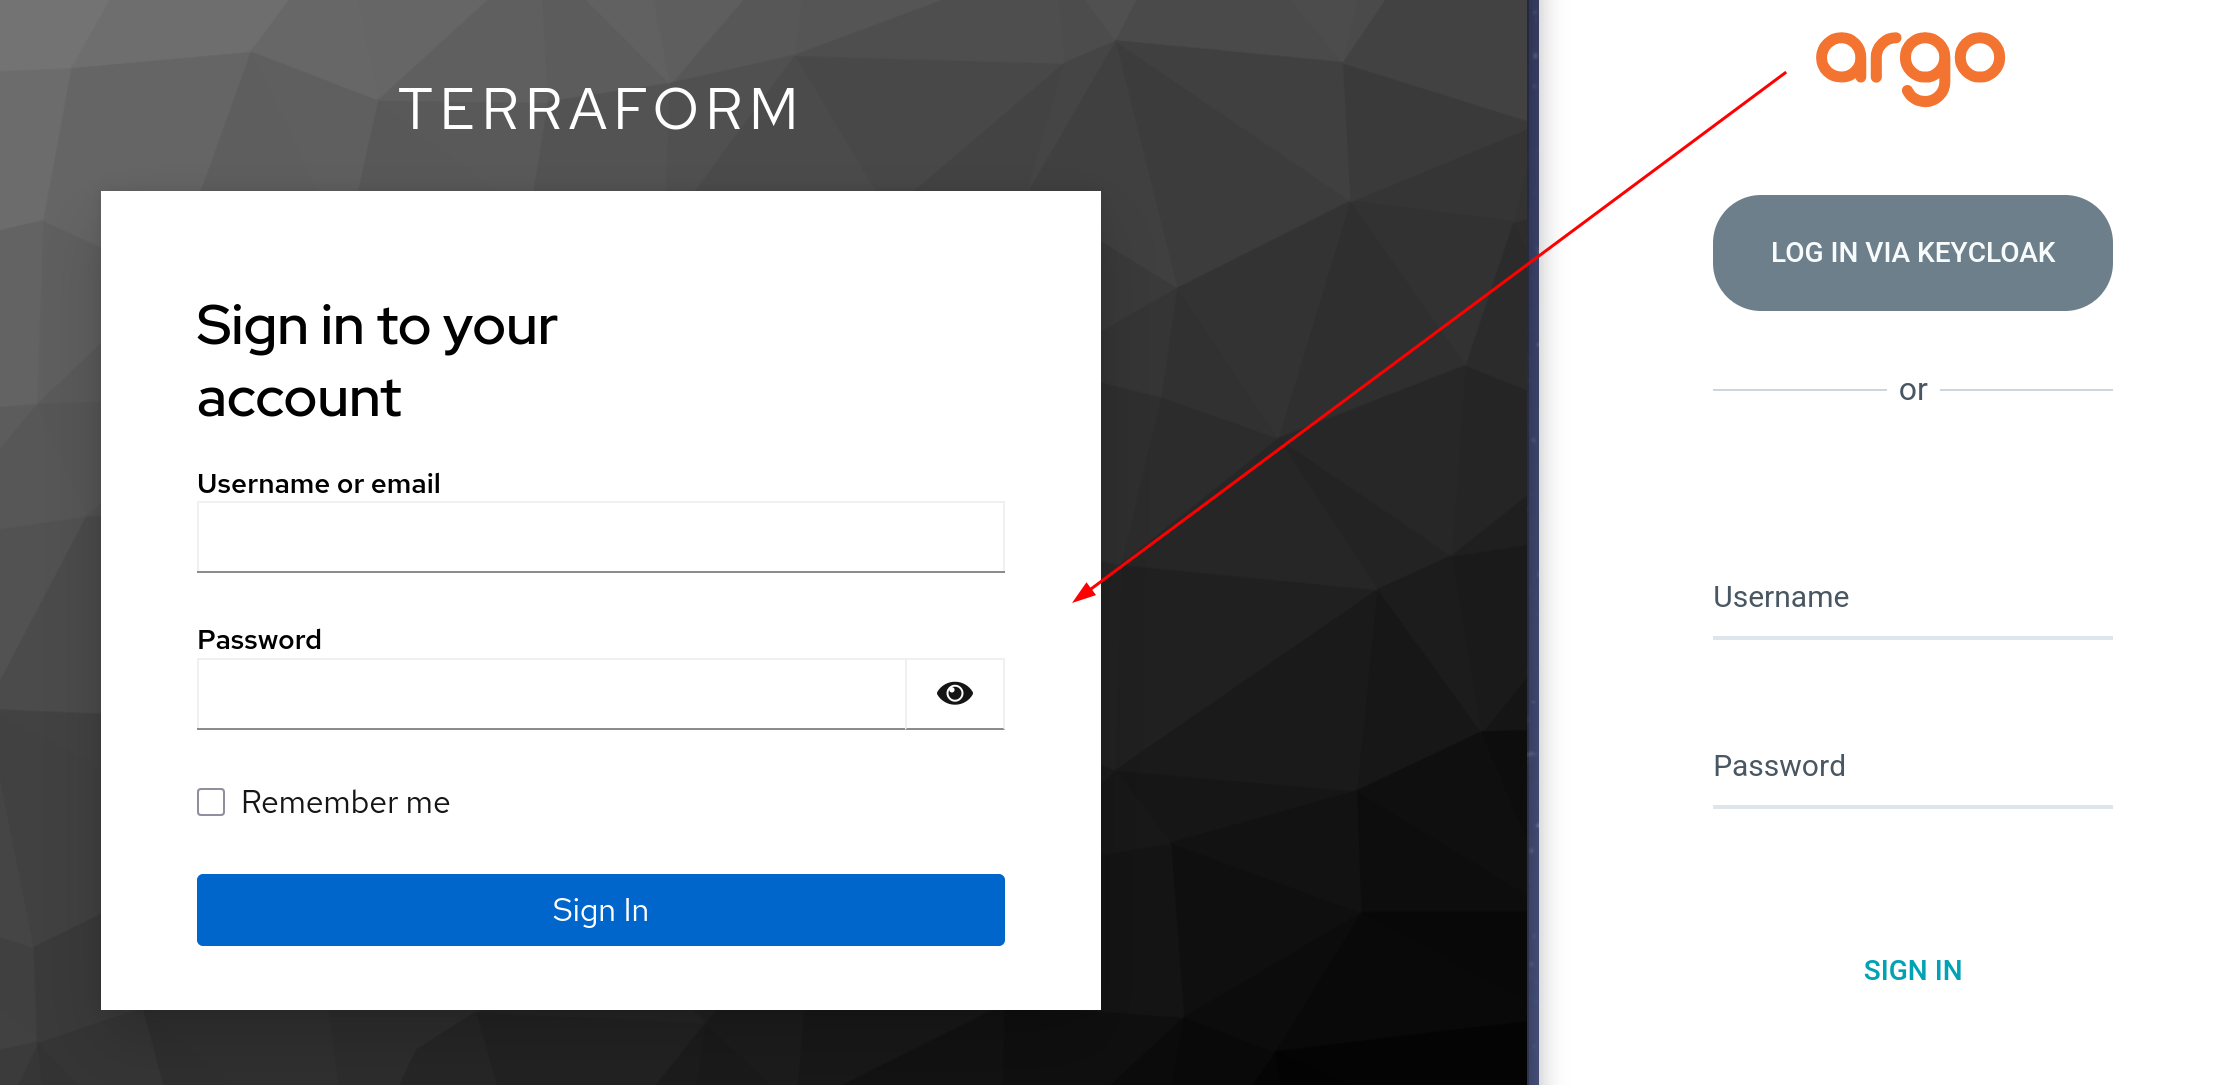
This is how we add groups scopes to the client. Now ArgoCD will include the groups claim in the id_token and map it to roles accordingly.
Other frontends
For applications without built-in OIDC support, you can offload authentication to an API gateway like Kong which is sitting in front of your application.
Kong OpenID Connect Plugin
Below is an example configuration to use the Kong OpenID Connect plugin.
1 | plugins: |
- issuer: Auto discovery the oidc well known endpoint and validate token issuer.
- client_id and client_secret: This is required to redeem the access token.
- auth_methods: We tells the plugin to use authorization_code and session authentication.
- session_storage: We store session data in cookie. If you have multiple data planes, you might want to store the session information in a shared redis instance.
- consumer_claim: This is used to map Kong consumers to Keycloak user.
Since I only have one user, I can rely on consumer_claim to look for the consumers. Let’s need to create a Kong consumer which has the same username as the keycloak username.
1 | consumers: |
If you want to grant access to a group of users without creating Kong consumers, ACL plugin can be used with Kong OIDC plugin. For more information, please check this post
Keycloak User and client
Redirect URL for my orders app client:
2
3
4
5
6
"https://<orders>/",
]
web_origins = [
"https://<orders>"
]
On the keycloak side, we just need to create the user called orders-admin.
1 | resource "keycloak_user" "orders-admin" { |
That’s all the configuration required. When you access your application at https://<orders>/, Kong will redirect the request to Keycloak for authentication. Keycloak will validate the user’s credentials and return id_token and access_token, which Kong uses to ensure the correct consumer is accessing your application.
With the Kong OpenID Connect plugin, you can focus on your application’s business logic, leveraging the token passed through by Kong. (Kong forwards the access_token to the upstream service.)
That’s all I want to share with you today. See you in the next one.